Aims
You may have a need to secure your fDocs outputs so that they cannot be changed by end users. This quick guide describes two ways in which you can achieve this by either locking docx outputs, or by switching your output format to PDF.
1 Locking Word docx outputs
This method allows you to lock a particular template so that when end users generate an output based on it, the document is locked and cannot be changed. This method is useful as you can optionally allow parts of your document to be edited (such as particular entries on a form), but lock other areas.
Note: This method cannot be used if you need to allow fDocs to automatically update tables of contents during document generation.
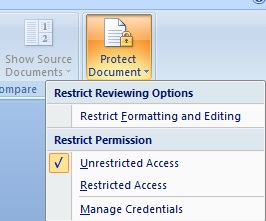
- When you have finished your template, from the Review ribbon in Word, select “Restrict Editing”. See Fig. 1.
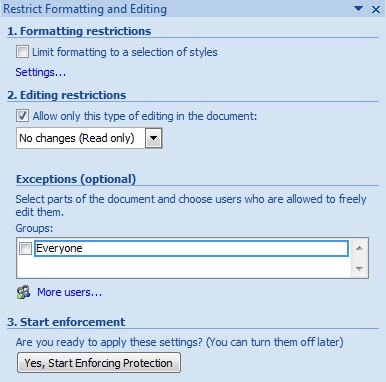
- From option 2, select whether to lock the whole document (Read only) or allow only fill in form entries or comments, depending on your need. Specify any exceptions if needed. See Fig. 2.
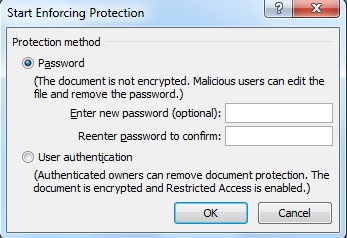
- Click “Yes, Start Enforcing Protection” and enter a password. See Fig. 3.
- Upload your template to the server as normal.
(Fig. 1)
(Fig. 2)
(Fig. 3)
Note: If you need to make any changes to your template at a later date, open/download your template then immediately unblock it using the password and continue as normal. You must do this before using the designer to make any further changes so that the designer does not get blocked by Microsoft Word.
2 Restrict fDocs to only provide PDF outputs
(From Version 3.5)
This method will force all outputs to be in PDF format, and therefore cannot be edited by the end user
- Log into fAdmin using appropriate credentials.
- Go to Settings, then fDocs.
- In the “fDocs Converter” field, select “Aspose.Words” or “Microsoft Word“.
(Note: Selecting “Microsoft Word” requires you to install Word onto the fSeries server and use DCOM Configuration to allow it to be launched by a nominated user account that has permission to open Word – please see section 2.1 below). - In the “Output Formats” box, enter simply pdf and click OK. All outputs will now switch to PDF format.
(Note: To retain docx and add pdf as an output, enter docx,pdf into the outputs field)
2.1 Setting up Microsoft Word on the server (requires server admin privileges)
To allow output in non-docx formats (including PDF generation) using Microsoft Word, Microsoft Word 2007 or above must be installed on the server and appropriate permissions set up to allow Word automation by the fSeries software:
- On the server, ensure Microsoft Word 2007 or above is installed.
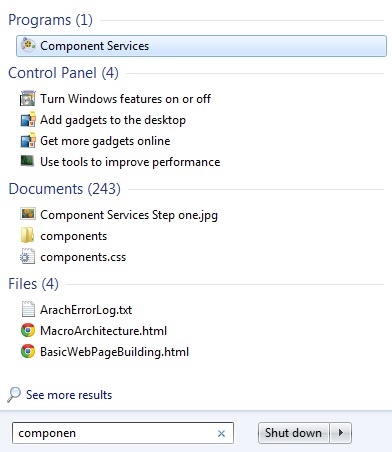
- Open Component Services from within Administrative Tools. See Fig. 4.
Note: If you are running Word 32-bit on a 64-bit machine, you must open Component Services in 32-bit mode by going to Start->Run, and typing in “mmc comexp.msc /32” and hitting enter. - Go to Component Services -> Computers -> My Computer -> DCOM Config ->Microsoft Word 97-2003 Document, and right click on the node and select Properties. See Fig. 5 and Fig. 6.
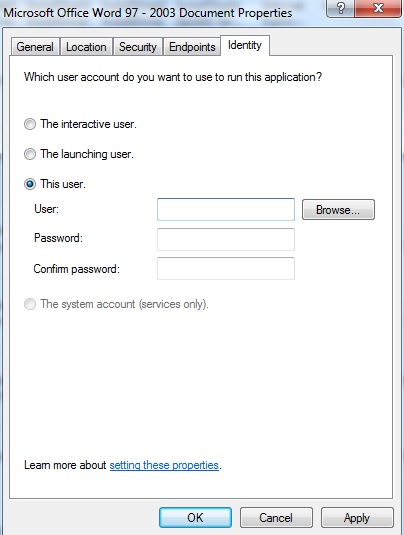
- On the Identity tab, select “This User” and select the user credentials of a nominated user/service account you want fDocs to use when generating the PDF files. Create a new user account for this process if you wish. See Fig. 7.
- On the Security tab, go to “Launch and Activation Permissions”, select “Customize” and click the Edit button.
- Ensure your user account you have selected/created in step 4 has “Allow” for all permissions.
- Click OK to close the dialogue, then repeat steps 4 and 5 for “Access Permissions”.
- If this is a new account, or the account you have created has never opened Word before, log into your server using this account, and open Word, then click OK to the dialogue that asks you to enter your name and initials, then close Word.
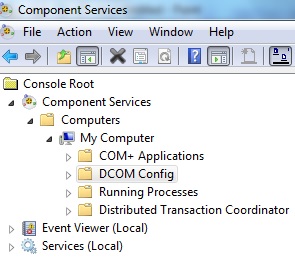
(Fig. 4) (Fig. 5)

(Fig. 6) (Fig. 7)

