Sometimes you may wish to use fSeries in order to report on data held in an Excel spreadsheet. By creating a Data Source within fAdmin, you are able to query a spreadsheet using SQL like you would do from a database. Through this method you can create well-presented, formatted document outputs based on Excel data, or create a panels presentation based on your Excel data.
Step 1: Set up your data
In Excel, check that your data is suitable. In the screenshot below, note the name of the worksheet, and the column headings. These are important because the name of the worksheet will become the table you query, and the column names will become field names. You must have a heading for each column, as shown below:

You can have as many worksheets as you like within your Excel document; each will become a new table. You may also import CSV’s into your Excel document to use as a data source if you wish.
Step 2: Create a data source in fAdmin
Log into fAdmin, and select “Data Sources”, and add a new data source. Give it an ID and a description that suits your requirements, and set its type as a Database Connection. The dialect should be set to Other and the connection type set to OLEDB.
For the connection string itself, enter the following if you have created an Excel 2000-2003 (XLS) workbook:
Provider=Microsoft.Jet.OLEDB.4.0;Data Source="C:\PathToYourExcelDocument\YourExcelFileName.xls";Extended Properties="Excel 8.0;HDR=Yes;IMEX=1";
Or if you have created an Excel 2007 or later (XLSX) workbook, enter the following:
Provider=Microsoft.ACE.OLEDB.12.0;Data Source="C:\PathToYourExcelDocument\YourExcelFileName.xlsx";Extended Properties="Excel 12.0;HDR=Yes;IMEX=1";
Use the “Test Connection” button to ensure your connection string is successful and your file can be opened from the fSeries server. Note that your Excel file cannot be connected to if you or anyone else has it open for editing in Microsoft Office as it will be locked.
Step 3: Create your data group in fData
Assuming you have already created a DSD, it’s time to add a data group to query your data.
Create a data group of type SQL, and in the Connection dropdown box select the data source you created for your Excel file. You can then enter a suitable SQL query to return data.
- Your worksheet name should be used with a $ sign after it, and enclosed in square brackets. Using the above Excel screenshot as an example, you would need to use [ClientInformation$] as the table name.
- If you have spaces in any of your field names, these should be enclosed in square brackets if they are referred to anywhere in your query. So, if your field name is Street Name, you should use [Street Name] in your query.
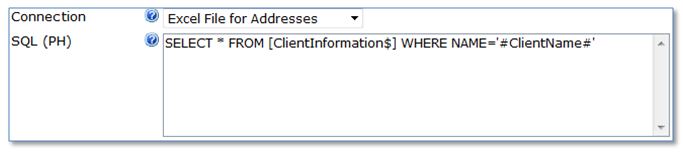
The following screenshot shows an SQL query to get all information from the Excel spreadsheet, based on a user entry of “ClientName”:
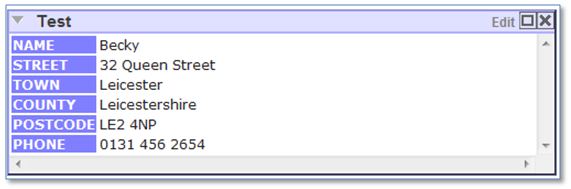
The following screenshot shows how this data group would look by entering “Becky” as the search criteria for the client name in a panels test:
If you wish, you can change the field names that are seen in the output by using the Translator section of the data group management dialogue. Pick the field you wish to change and enter its translated description next to it.

