This “How-To” centres around those times when you want to conditionally show parts of your template, but the standard compare tag isn’t complex enough for your requirements, because you may be within a set of repeating data in a data group, or because you have an “if this else this” structure you wish to create.
Tips
- Have “show paragraph marks” switched on in Word. This makes it easier to see where you are in your template.
- Make sure you have some “returns” above and below the object so that it’s easy to apply the conditions. If you want to surround a table you should have one above and below which will be included in the condition. You can remove these extra returns after you have applied the condition – this is just to give you some room in which to work.
- Use the arrow keys on your keyboard to move the cursor to the appropriate position within your template. This is particularly useful when you need to put one tag just inside another tag and Word is “moving” your cursor outside of it when you click with the mouse.
Scenario: Using a condition tag within a Data Group
- Create the condition on the DSD using fData.
- Build the table/text object in your template.
- Add the data group tag around all the content which will contain the child field tags.
- Place the condition tag(s) around the particular content which you want to display only if the condition is met.
Scenario: Displaying specified records only within a Data Group in a table
- Create the condition on the DSD.
- Build the table in the usual 2 row format.
- Highlight the second row and add the Data Group tag.
- Add the data tags to the cells.
- Because you need to have 2 tags around the same row it can be tricky to place the condition tag in the right place, i.e. the condition tag needs to be inside the data group tag, so that it is effective within the data group and not outside it, so:
- Remove the data group tag only by clicking on it and then “detach tag”
- Highlight the entire row in your table by clicking to the left of it, or highlight all the tags you want to show when your condition applies and apply the special tag for your condition.
- Reapply the data group tag to the row in the usual way by highglighting the whole row in the table, or clicking around all the content (including the newly added condition tag):

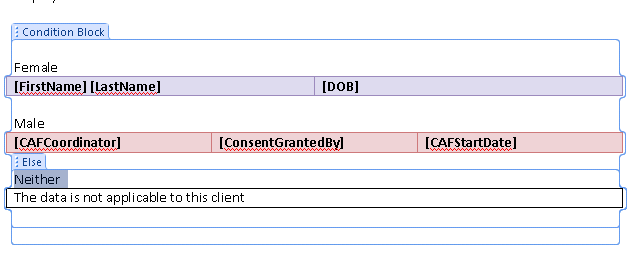
Scenario: Either / Or / Else Condition Blocks
In this scenario you have more than one condition. You want to apply each condition to a different object, the end result should just be one of the objects is displayed when the condition is met. If no condition is met then a different object is displayed which is the “else”.
This is achieved with a condition block tag. This tag ensures that each condition is evaluated in turn, once it finds the first “true” condition it completes, thus resulting in just one of the objects being displayed. Or, if none of the conditions are met is displays the object tagged with the “else” tag.
- Create the condition on the DSD.
- Build the table/text object.
- Add the tags in the usual way.
- Apply the condition special tag to the whole table , including a space above and below.
- Repeat for each object.
- Build the object which is to be the “else” object.
- Place a “Condition Block” special tag around all of the objects, and then apply the “Else” tag to the object to be shown when none of the conditions are met.